Want to Downgrade to an Older Version of Android? Well, we have compiled this article just for those people who might have just upgraded to the latest version of android and feel the need to roll back to the previous version for certain unique reasons.
But keep in mind that switching back to a previous version of Android is generally not recommended. But like the headline above states, it isn’t impossible. And downgrading isn’t a process that is officially supported by manufacturers. It isn’t easy to do, it may void your warranty, and you could potentially brick your device.
How to Downgrade to an Older Version of Android
First things first the software downgrade of your device will depend on if you can unlock the bootloader. Devices from Google or OnePlus can be easily unlocked, while those from Huawei, Samsung, or Nokia may be impossible to unlock.
And a heads-up because Unlocking the bootloader will wipe your internal storage. So a word of advice is to back up all of your data before you begin this process. After you have secured your data you’ll need to download an Android factory image of the version you want to go back to, and it has to be specifically designed for your device.
Google provides Pixel users with a list of factory images. If your phone is not on this list then you’ll have to find an official factory image for your device. If you cannot find them on the manufacturer’s website, then just head over to the XDA Developers forums.
You’ll also need to download and install the Android SDK in order to use the ADB and fastboot tools. Check out our guide to ADB and fastboot to familiarize yourself with these.
The downgrade process begins
The first thing you need to do is turn on Developer options on your phone by going into Settings. And find the About phone section. Once there tap the Build number until you get a message that says “You are now a developer!”.
Next, go into Developer Options and enable USB debugging and OEM unlocking. Once done Connect your phone to your PC with a USB cable. On your PC, navigate to the folder where the Android SDK is saved, and put the Android factory image you downloaded there.
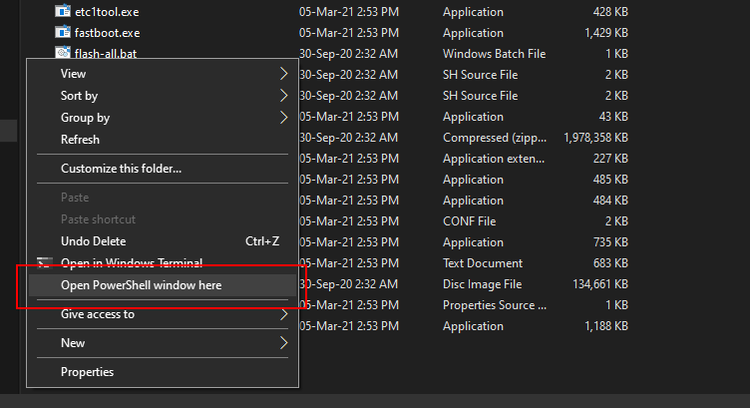
Factory images usually come in ZIP files that contain IMG files; unzip the factory image right there on the Android SDK folder. Now, while still in the Android SDK folder, hold Shift then right-click inside the window, and then select Open PowerShell window here.

In the PowerShell window that opens, type adb devices to check if your phone is being detected. If it is, you should see its serial number listed. If not, try using a different USB cable.
Now you have to boot your device into fastboot mode. To do this, type adb reboot bootloader in PowerShell. After this step is done it is time to unlock the bootloader.
Depending on your device, type fastboot oem unlock, and if this doesn’t work, type fastboot flashing unlock instead. If everything goes well you should see a confirmation on your device that the bootloader is now unlocked.
Bootloading time
Some manufacturers will include a “flash-all” script as part of the downloaded factory image that will automatically flash everything for you. If this is the case, the script should be in the Android SDK folder, along with the IMG files you extracted.
Double click on the flash-all.bat script. A box should pop up showing you the flashing process as it happens. DO NOT unplug your phone during this process.
Your phone should now restart. If everything went well, you should now be running a downgraded version of Android. You’ll need to set your phone up again from scratch.

